Carabiners for Crevasse Rescue on a Beginner/Intermediate AAI Course
Disclaimer – This is not meant to be a substitute for education, just some preliminary info for people climbing with AAI. Please take a course and get yourself educated before heading out there on your own. The images in this write up are not meant to be perfectly accurate representations of crevasse rescue, but rather a visual for students to see where carabiners will be implemented.
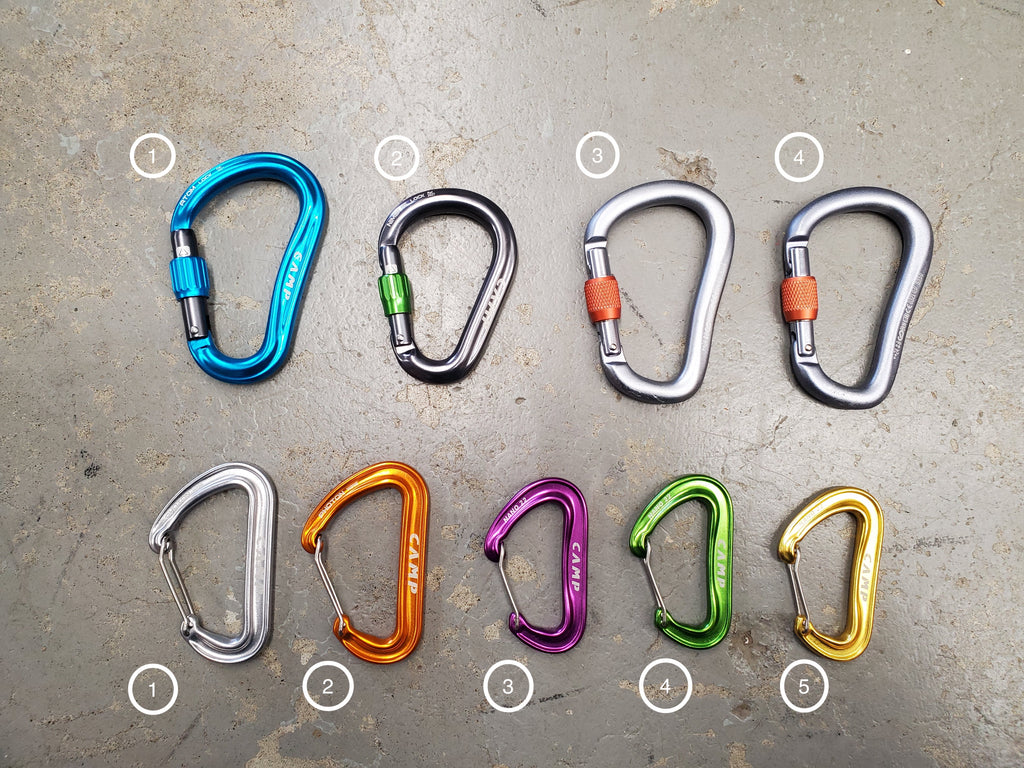
** The amount of carabiners needed to perform all rescues on beginner to intermediate level courses that teach crevasse rescue is 4 locking carabiners and 5 non-locking wire-gate carabiners.
Locking Carabiners
1. Master Carabiner - We want this carabiner to be large and pear shaped. The master carabiner will have more things clipped to it, as shown in a later photo.
2. Secondary Locker - This carabiner will be used in transitioning to your haul system from self-arrest and anchor building. Eventually it gets used to close the system and 6:1 haul system set up.
3. and 4. Harness Carabiners - These two carabiners will both live on your belay loop on your harness and stay there the entire time. They are used for personal protection while moving to and away from the lip of the crevasse and as you set up your haul systems and haul. Note that they are exactly the same, which is ideal.
Non-Locking Carabiners
1. Main Haul Pulley - This carabiner will eventually act as the main haul pulley. It will be connected to the Master Carabiner, this is depicted in a later photo.
2. Anchor Back-Up Connector - This carabiner will be used to connect your back up anchor to your first anchor. This will also be clipped into the Master Carabiner, depicted in a later photo.
3. Lip Protection Carabiner - The ice axe is a common method used to protect the lip of a crevasse. This carabiner will be used to attach the ice axe with a sling to the climbing rope, so it does not fall in the crevasse. Depicted in a later photo.
4. Tertiary Haul Pulley - This carabiner comes into play in a 6:1haul system set up. Depicted in a later photo.
5. Secondary Haul Pulley - This carabiner comes is used for a 3:1 haul system, as well as the 6:1. Depicted in a later photo.
i
i
i
3:1 Haul System

- Above is a picture of a 3:1 haul system set up. Notice the yellow non-locker connecting the red cord to the climbing rope. This is the secondary haul pulley.

- Above is a closer look.
-Notice the light blue master carabiner and how many other things are connected to it. This is the reason we want this carabiner to be large and pear shaped.
-The orange non-locker is connecting the second picket (which in this case is the back up anchor) to the master carabiner.
-The silver carabiner is the main haul pulley.
-The gray locker is the secondary locker, it is currently unoccupied but remains on the master carabiner to be used to close the system and set up a 6:1 haul system.
Lip Protection

- Above is a depiction of how an ice axe would be attached to the climbing rope at the lip of a crevasse.
-Notice the purple non-locker being used here, as well as a single length sling.
6:1 Haul System

-Above is a depiction of a 6:1 haul system.
-Here we add more mechanical advantage but need another rope grab and pulley. Here the orange cord is the extra rope grab, and the green non-locker acting as the tertiary haul pulley.
-Notice the harness with the other two lockers attached to it. In a real scenario you would be tied in to the extra climbing rope to protect yourself from falling into the crevasse.

- Here is another close up look.
-Notice how the gray secondary locker is now being used. It has a figure eight on a bight clipped into it to close the system and 6:1 haul set up.